24.11.2013

Joulukoristeita vanhoista korteista | Christmas card ornaments

Olen jouluihminen, vaikken varsinaisesti nauti sen aiheuttamasta hässäkästä. Lähetän kuitenkin joka vuosi paljon kortteja ja saankin niitä jonkin verran. Olen pitänyt suunnilleen kaikki kortit, joita joskus olen saanut, ja miettinyt, miten niitä voisin muokata niin, että niistä olisi iloa myöhempinäkin vuosina. Nyt vihdoin keksin niille loistavan uusiokäyttökohteen: koristepallot!

I'm a Christmas person though I don't like the fuzz in stores. I however send quite a lot cards everey year and receive some too. I've kept all the cards I've received and tried to think a way to use them in future years too. Finally I came up with this idea of making cute ornaments from them!


Tarvikkeet | You need:

  • vanhoja joulukortteja | used Christmas cards
  • viivottimen ja kynän | ruler and a pencil
  • sakset | scissors
  • paperiliimaa | paper glue
  • neulan ja lankaa ripustukseen | needle and a thread for hanging


Mitä erilaisempia kortteja sinulla on, sen koristeellisempia palloista tulee. Käytä myös kortteja, joissa on kimalletta tai lasten itse tekemiä kortteja, jokainen pallo saa olla täysin erilainen! Käytä alla olevaa kuvaa mallina ympyröiden ja kolmioiden piirtämiseksi kortteihin.  Tee 20 ympyrää ja leikkaa ne irti. Leikkaa myös kolmio irti paperista malliksi ja piirrä sen avulla kolmiot kaikkiin ympyröihin. Taita sitten ympyrän reunat ylös kolmion viivoja pitkin. Voit käyttää tässä apuna viivotinta, koska kova korttipahvi saattaa muuten taittua helposti väärästä kohtaa tai mutkalle.

The more cards you have, the more colorful the ornaments will be, every one will be different. Use the image below as a stencil to make 20 circles and cut them off. Just scale it to the size you want to. Cut also the triangle out of the stencil and draw triangles inside all circles with it to create flaps. Then fold flaps as shown in the image below. You can use ruler to make sure all folds are straight.


Kun olet taittanut kaikkien ympyröiden reunat, voit aloittaa liimaamisen. Liimaa ensin 5 ympyrää toisiinsa niin, että kaikki kolmiot ovat samoin päin. Näin syntyy pallolle hattu. Tee toinen samanlainen pohjaksi. Liimaa sitten loput 10 ympyrää toisiinsa alla olevan kuvan mukaan. Näin syntyy tasainen keskiosa. Liimaa lopuksi pohja ja hattu keskiosaan kiinni. Jos palat eivät meinaa pysyä kiinni toisissaan ennen kuin liima ehtii kuivua, voit nipistää palat toisiinsa pyykkipojalla.

Once all the flaps are folded start glueing them together.. First glue 5 circles together so that the triangles point up to create a hat (see image below left). Then glue other 5 ones the same way to create a bottom for the ornament. To create middle part glue the rest 10 circles together so that they form a straight line (see image below right). Once the parts have dried you can glue the hat and bottom to the middle part. You can pinch the parts together with a clothes pin if they open up before the glue dries.


Jos värikkäät joulukoristeet eivät ole sinun juttusi, niin voit käyttää myös hillitympää koristeellista paperia näiden koristeiden tekoon. Valmiit koristeet ovat kauniita ja jokainen varmasti erilainen.

If decorative and colorful ornaments are not your cup of tea, you can always use less flashy cards or scrap paper. The ornaments should be just the way you want them to be, no other limitations!


Halauksin | Hugs,
Eeva

5.11.2013

Koiranpeti ilman ompelua - No sew dog bed

Mietin pitkään, mitä voisin tehdä tästä pieneksi jääneestä aamutakista. Näin jossain villapaidasta tehdyn koiranpedin, joten paitaa isommasta takista saa siten oikein muhkean pedin. Parasta tässä on se, että tässä ei tarvitse osata ommella milliäkään!

I was thinking hard for a long time what to do with the morning gown that didn't fit me anymore. Then I saw somewhere a dog bed made from a sweater and I decided that well, a gown would definitely make a bigger bed. The best part is that you don't have to sew an inch!

Tarvikkeet | What you need:

  • Vanha aamu- tai kylpytakki | One old morning gown or similar
  • Takin vyö tai vastaava | A belt
  • 1 iso ja 2 pienempää tyynyä | 1 big pillow and 2 smaller ones
  • Sakset | Scissors

Levitä takki pöydälle ja suorista se saumojen mukaan. Laita sitten iso tyyny takin sisään noin vyörärön korkeudelle ja käännä helma tyynyn päälle. Käännä vielä näin syntynyt tyynytasku tiukasti takin kauluksen alle. 

Put the gown on a table and pleat it as shown in the photos. Tuck the big pillow inside the gown on weist height and flip the hem over it to create a pillow case. Then flip the pillow case once more to fit it inside the neck of the gown.


Pujota sitten pienet tyynyt kummankin hihan yläosaan. Then tuck the smaller pillows into the upper part of the sleeves.


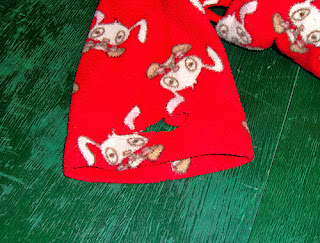
Kun tyynyt ovat hihoissa, niin taita loppuosa hihoista litteäksi ja leikkaa reikä kumpaankin hihansuuhun käänteen taakse. Näin reikä ei ala purkaantumaan ja se kestää kiristystä hyvin.

Now straighten the rest of the sleeves and cut a hole on both cuffs.


Pujota nyt takin vyö läpi rei'istä ja solmi sillä hihat yhteen. Pujota sitten yhteensolmitut hihat ison tyynyn eteen niin, että pedistä tulee laatikkomainen. Valmis! Sitten kun peti näyttää tarvitsevan pesua, niin avaa solmu ja ota tyynyt pois takin sisältä ja heitä takki pesukoneeseen.

Loop the belt through the holes and fasten the sleeves together in front of the big pillow. Done! Once the bed is in need of a wash, just open the belt, remove the pillows and wash the gown.


Halauksin | Hugs,
Eeva